Processing a New Prescription
-
Data Entry
-
Packaging
-
Technical Validation
-
Clinical Review
Data Entry
For new prescriptions, the Data Entry queue includes:
-
Using the Intake window for new prescriptions and adjudicating them through Rx Detail.
-
Processing and adjudicating prescriptions that were added to the Workbench, either from the Intake window or one of the programs the patient is enrolled in or your pharmacy is registered for.
For more information about prescriptions that are already in the Data Entry queue, see Processing prescriptions from the Data Entry Queue.
Select the applicable tab to learn about processing new prescriptions in your province.
Refer to the Creating and Dispensing Prescriptions on the EHR section of the British Columbia PPM User Guide.
Next Steps?
If the patient already has a record of this medication on their Profile, a Duplicate Checking prompt appears to confirm how to handle the new prescription.

To gain better insight on how to handle the new prescription, the Duplicate Checking prompt displays information about the existing prescription on file, such as:
-
Rx#
-
Quantity filled
-
Days supply
-
Refills remaining
Based on the information displayed, select one of the following:
-
Refill - Refills the prescription currently on file.
-
ReAuth - reauthorizes the existing prescription on file, voiding any repeats remaining.
-
New Rx - creates a new prescription and does not link it to the current prescription on file.
-
Cancel - returns to the Intake window.
To process a new prescription:
-
From the Workbench or from the patient's Profile tab, select Intake. The Intake window appears.
-
In the Patient field, search for and select the patient.

This information is automatically populated if creating a new prescription from the patient's Profile tab.
-
Optional - Select the Clinical tab to review, add, or update any clinical information or clinical notes in the Patient Folder as needed. For more information on this tab, see Clinical from Intake Overview.
-
Select the Data Entry tab.
-
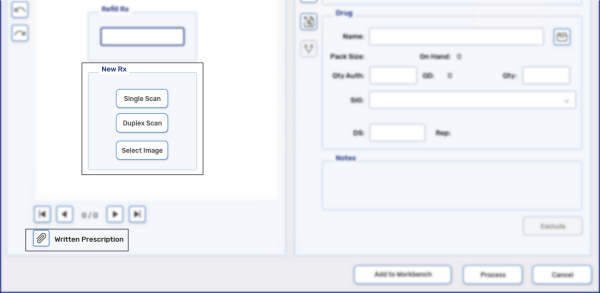
Attach a prescription by selecting one of the following options:
-
Single Scan/Duplex Scan - allows you to scan the prescription at time of entry.
-
Select Image - allows you to select a scanned document attached in the Patient Folder.
-
 Written Prescription - allows you to select a document saved on the workstation.

If you're only collecting the prescription from the patient and the prescription is being adjudicated at another workstation, or at another time, once you have a patient selected, you can select Add to Workbench. This adds the prescription to the Data Entry queue for later processing. It is recommended a prescription is scanned at Intake before doing this.
For more information about processing this prescription at another workstation or at a later time, see Processing prescriptions from the Data Entry Queue.
-
-
Enter the following information:
-
Prescriber
-
Drug Name
If you have a scanner attached to the workstation, you can scan the UPC of the bottle.
-
Qty Auth
-
Qty
-
SIG
-
DS
-
-
Optional - In the Notes section, select Add (+) to add a prescription note. This note will be visible from the Notes tab after you process the prescription into Rx Detail.
-
Select Process. The prescription opens in Rx Detail.
If the drug is already on the patient's Profile, a Duplicate Checking prompt appears. For more information, see Duplicate Checking.
-
The Patient EHR Access Reason window opens if the patient's EHR Profile has not been viewed yet. Select a reason for accessing the patient's EHR Profile and enter any additional comments if needed. Select OK.
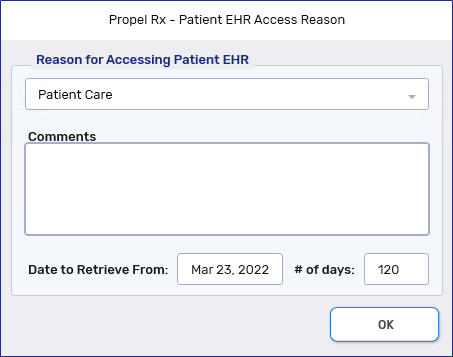
Review the patient's EHR Profile and select OK once done.
-
Verify the information in Rx Detail and make any necessary changes.
If Close is selected when in Rx Detail, the prescription remains in the Data Entry queue and can be accessed from there. For more information, see Processing prescriptions from the Data Entry Queue.
-
Select Fill to adjudicate the prescription.
-
If there are any Detected Issues, the Detected Issues Maintenance window opens. Review the window and add any appropriate Issue Management codes as needed.
-
Select OK.
-
The Claim Summary window opens. Review the window and make any necessary waives.
-
Select OK.
Next Steps?
If the patient already has a record of this medication on their Profile, a Duplicate Checking prompt appears to confirm how to handle the new prescription.
To gain better insight on how to handle the new prescription, the Duplicate Checking prompt displays information about the existing prescription on file, such as:
-
Rx#
-
Quantity filled
-
Days supply
-
Refills remaining
Based on the information displayed, select one of the following:
-
Refill - Refills the prescription currently on file.
-
ReAuth - reauthorizes the existing prescription on file, voiding any repeats remaining.
-
New Rx - creates a new prescription and does not link it to the current prescription on file.
-
Cancel - returns to the Intake window.
To process a new prescription:
-
From the Workbench or from the patient's Profile tab, select Intake. The Intake window appears.
-
In the Patient field, search for and select the patient.
This information is automatically populated if creating a new prescription from the patient's Profile tab.
-
Optional - Select the Clinical tab to review, add, or update any clinical information or clinical notes in the Patient Folder as needed. For more information on this tab, see Clinical from Intake Overview.
-
Select the Data Entry tab.
-
Attach a prescription by selecting one of the following options:
-
Single Scan/Duplex Scan - allows you to scan the prescription at time of entry.
-
Select Image - allows you to select a scanned document attached in the Patient Folder.
-
Written Prescription - allows you to select a document saved on the workstation.
If you're only collecting the prescription from the patient and the prescription is being adjudicated at another workstation, or at another time, once you have a patient selected, you can select Add to Workbench. This adds the prescription to the Data Entry queue for later processing. It is recommended a prescription is scanned at Intake before doing this.
For more information about processing this prescription at another workstation or at a later time, see Processing prescriptions from the Data Entry Queue.
-
-
Enter the following information:
-
Prescriber
-
Drug Name
If you have a scanner attached to the workstation, you can scan the UPC of the bottle.
-
Qty Auth
-
Qty
-
SIG
-
DS
-
-
Optional - In the Notes section, select Add (+) to add a prescription note. This note will be visible from the Notes tab after you process the prescription into Rx Detail.
-
Select Process. The prescription opens in Rx Detail.
If the drug is already on the patient's Profile, a Duplicate Checking prompt appears. For more information, see Duplicate Checking.
-
Verify the information in Rx Detail and make any necessary changes.
If Close is selected when in Rx Detail, the prescription remains in the Data Entry queue and can be accessed from there. For more information, see Processing prescriptions from the Data Entry Queue.
-
Select Fill to adjudicate the prescription.
Next Steps?
If the patient already has a record of this medication on their Profile, a Duplicate Checking prompt appears to confirm how to handle the new prescription.
To gain better insight on how to handle the new prescription, the Duplicate Checking prompt displays information about the existing prescription on file, such as:
-
Rx#
-
Quantity filled
-
Days supply
-
Refills remaining
Based on the information displayed, select one of the following:
-
Refill - Refills the prescription currently on file.
-
ReAuth - reauthorizes the existing prescription on file, voiding any repeats remaining.
-
New Rx - creates a new prescription and does not link it to the current prescription on file.
-
Cancel - returns to the Intake window.